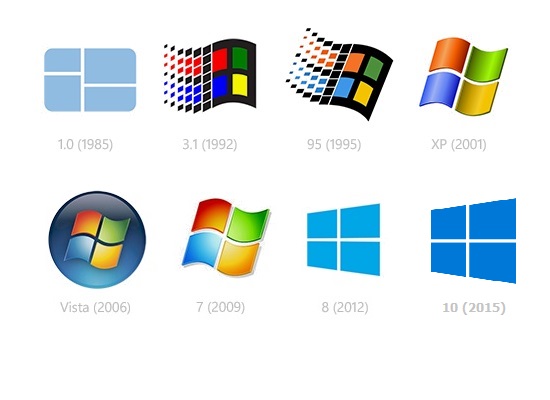
Network Tools for Windows Phone


I’ll be honest, Windows Phone app development is stagnant. As I get more and more excited for Windows Universal Apps that will run across platforms, I don’t often enough see the little icon indicating that the app I’m using is future proof and ready for Windows 10 Mobile, or just to use it on Windows 10 desktops. But that can’t stop me from using my phone in the ways I need it.


After recently migrating to a Lumia 640, I went to reinstall an app I had previously suggested (a very simple Ping utility) which has gone missing! So now I have found a new app to help me with some day to day Network testing. Network Tools, a simply named app from TwinTaps, has proved to be a wonderful tool to carry in my pocket.


With support for everything from WHOIS, to Ping, to NSLookup, and even the ability to check the IP, both local (such as 192.168.x.x) and public (like IPChicken or similar websites!), I find that Network Tools might just be one of the most under appreciated apps available for the Windows Phone. It’s very impressive, and I certainly hope it gets updated and is available when Windows 10 Mobile launches in the coming weeks and months.

How to save as Word / Excel / PowerPoint DOC XLS PPT files in LibreOffice

LibreOffice (and it’s grand daddy, OpenOffice) are excellent programs with a long history in the Open Source community. The projects provide a wonderful inexpensive or even completely free alternative to the power house, Microsoft Office.


I’m often asked if there’s a way to open your Word, Excel, even PowerPoint files with LibreOffice. The good news is that once you install LibreOffice, it can automatically take over file associations, meaning that when you double click a .DOC (Word ’97-2003) or .DOCX (Word 2007-2016) file, it will open right up in the LibreOffice “Writer” module, just as if it were opening in Word.


But what about Saving files? By default, LibreOffice uses an ‘Open Document Format’ or ODF Text (.odt) file format to save documents. Although these should open in Microsoft Word, sometimes you send these files to colleagues, friends, or teachers, and the document won’t open on their end, and you catch heat. So the easiest thing to do is to make sure you’re saving all of your files in a compatible Microsoft Word format. Same goes for other document types. I’ll show you how to change the DEFAULT SAVE-AS FILE TYPE in LibreOffice to Microsoft compatible documents (I will provide examples of “Word” and “Excel” compatible files, once you have this down, you will be able to do other formats as well).

  1. With LibreOffice installed (for this example I’m using version 5.0.1.2, September 2015), just click the “LibreOffice” icon on the desktop or in the Start Menu, then click “Writer Document” on the left, to create a new Writer document.
  2. Click Tools from the Menu Bar across the top, then Options at the bottom of the Tools menu.
  3. In the Options Menu, click the “+” sign beside “Load/Save” then click on General underneath that.
  4. At the bottom right, you’ll see an option that says “ODF Text Document.” Click that Drop Down and change it to Microsoft Word 2007-2013 XML (to save as .DOCX), or Microsoft Word 97-2003 (to save as .DOC).
  5. Next, click the drop down box above that, which simply says “Text document” and change it to “Spreadsheet.”
  6. Now change the bottom box from “ODF Spreadsheet” to Microsoft Excel 2007-2013 XML (for saving as .XLSX files), or Excel 97-2003 (to save as .XLS files).
  7. Click OK.

You can also change “Presentations” to PowerPoint compatible files (.pptx/,ppt). Important when choosing a Microsoft Word, Excel, or PowerPoint format, make sure you do not choose “TEMPLATE” by mistake. You do not want to save your every-day documents as TEMPLATES (an option you can see in some of the drop down list screen shots above), or that will cause issues for the people opening them.


That should do the trick, though! You now have a fully functional free alternative to Microsoft Office! Enjoy!

How to use “Hey, Cortana” with only voice commands in Windows 10

Now that you’ve upgraded to Windows 10, there’s the “Ask me anything” field at the bottom of the screen, right next to the Start Button. If you click on that, you’ll get introduced to Cortana, your personal assistant. We were promised the ability to activate Cortana by voice, by saying “He, Cortana” – but I didn’t see that option when I first started using the new feature. I clicked the Microphone, and it had me say a phrase so that it could adjust volume levels and learn to understand me better, but nothing was mentioned of “Hey Cortana.” So I did some digging.


First, you have to click in the “Ask me anything” box, then click on Cortana’s notebook on the left, then click the settings cog icon. Once you’re in there, you can scroll down and enable “Hey Cortana.” By default, it’s designed to listen for any mention of that phrase (meaning she will respond “to anyone”). You’ll notice the option to respond “to me” is probably not selectable, but you can easily click “learn my voice” and speak a half-dozen phrases, saying “hey Cortana” before each one. If you use the same cadence each time, she will learn to better respond only to you, and not every podcast you listen to or jerk friend near by.


If you have problems, you can always instruct her to re-learn your voice. Also, I’ve noticed that, after you ask a question, such as “hey Cortana — what does the weather in Saskatchewan this weekend?” – the Cortana window will stay up on the screen until you click the “X” in the upper right. OR you can use another command, “Hey Cortana — please close” and the Window will go away.


It’s also worth noting that, if you speak up, Cortana can hear you over your music, and will pause the music playing to listen to your question. When you’re done, you can say “Hey Cortana — resume music” and Groove Music will pick up right where it left off. I haven’t tested this with Windows Media Player or any other software, yet, but I did find that to be pretty darn handy!

No, Windows 10 actually DOESN’T share your networks without your authorization

I’ve been reading people complaining about this for a few weeks now. It’s completely blown out of proportion, and has been a feature in Windows Phone for over a year.

The central reason people put passwords on their Wi-Fi is to stop total strangers from sitting in a parked car on the street and using their internet. Wi-Fi Sense, if enabled, allows you to share connectivity with your friends, without having to reveal the actual passwords. If anything, it’s not only more convenient, but safer.

  1. You have the option of turning this service on or off when installing Windows. It’s not hidden in a menu, or Continue reading “No, Windows 10 actually DOESN’T share your networks without your authorization”