
A couple of details, first: if your issue is simply one of disk space on a physical computer, there may
Continue readingAuthor: admin
Robo and Kala: Restore to Factory Default
I’ve had the Robo and Kala Windows tablet for a few years now and it has been one of the
Continue readingEvery Windows Update for Windows 8, 8.1, Server 2012 R2 x86 / x64
Several years ago, I was using a tool called WSUSOffline, which could make an ISO for easy distribution and rollout
Continue readingEvery Windows Server 2012 (non-R2) Windows Update
Several years ago, I was using a tool called WSUSOffline, which could make an ISO for easy distribution and rollout
Continue readingPurging old Linux Kernels
In Debian based derivatives, such as Ubuntu, Mint, Zorin, and other distros that use the “apt-get” package manager, I’ve noticed
Continue readingMicrosoft Surface “USB Device Not Recognized” notification every few seconds after Windows 11 upgrade SOLVED!
A Microsoft Surface computer that was recently upgraded from Windows 10 directly to Windows 11 25H2 was popping up the
Continue reading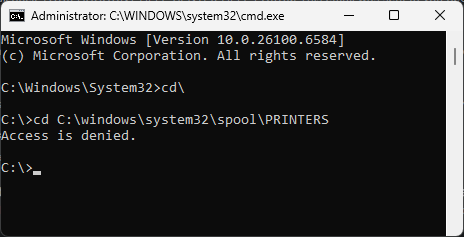
WARNING: Windows 11 changes Folder Permissions
This would’ve infuriated me… if it weren’t for the fact that it happened on a Virtual Machine and I had
Continue reading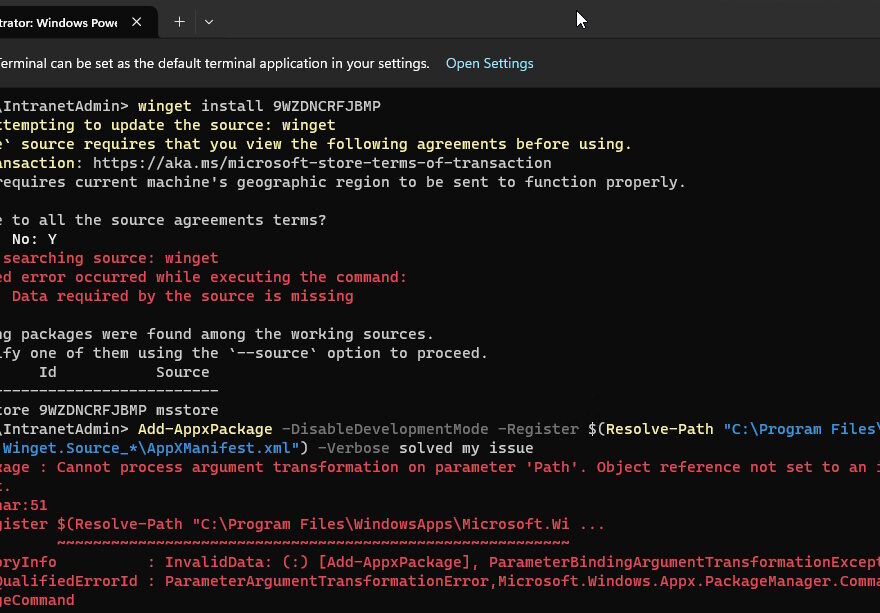
SOLVED: Unable to reinstall the Store in Windows 11
In a troubleshooting frenzy trying to fix someone else’s mistake, I spent hours troubleshooting a messy situation where I couldn’t
Continue readingMy History in PHONES
Born in the 1980’s, I’ve never had a land-line phone registered in my own name. But I’ve had my own
Continue reading
How do I know if I can trust what I’m downloading online?
When you’re downloading a file off of the internet, like an installer for a program or even a full disc
Continue reading
Setting up Windows 11 without a Microsoft Account
Although I’m a big believer in the usefulness of a Microsoft account, there are times that I want to set
Continue readingWindows 11 24H2: “insufficient system resources” trying to login
I’ve talked about running a SAMBA Domain Controller before. It definitely has its ups and downs, but damn Microsoft loves
Continue readingDoes Facebook store passwords insecurely?
In 2017, I had stumbled on an issue with Facebook: while you are entering your password, adding a superfluous extra
Continue readingSpy Craft of the 22nd century: Quantum Entanglement
I’m not a I’m not a quantum physicist, nor a computer scientist. But Microsoft released this video a few months
Continue readingUbuntu Linux CPU usage / CPU temperature high? Try this…
We have an Ubuntu based mini computer at which serves as little more than a network switch. CPU and other
Continue readingCannot locate base snap core22 – easy fix
A co-worker came to me recently because they had an Ubuntu Linux 22.04 computer on which restored a “Timeshift” backup,
Continue readingMicrosoft Outlook Office 365, how to Send From / As / On Behalf Of
These instructions are for Outlook on the Web. Once you have been added to role or given an alias, you
Continue reading
Generating a self-signed certificate PFX file with Powershell
Sometimes you need a self-signed SSL certificate for an internal project, but perhaps you’re restricted from using a 3rd party
Continue reading
How to create PEM and PFX Certificates and Keys with OpenSSL
OpenSSL has become THE standard for generating certificates for casual needs. Here’s how quickly you can create your own self-signed
Continue reading
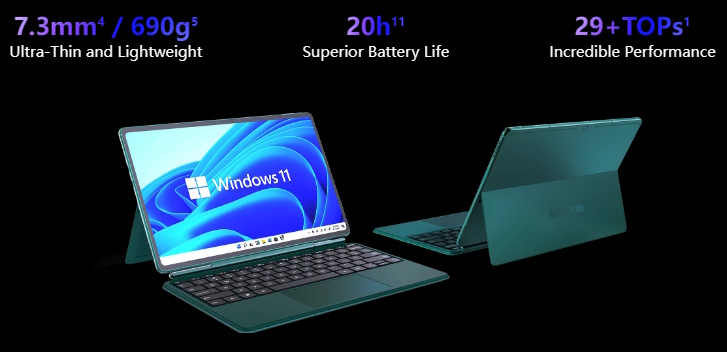
Robo & Kala 2 in 1 Laptop Review
Back in September, I purchased the Robo & Kala 2 in 1 Laptop. I was looking for tablet that specifically
Continue readingWhat my energy bill looks like with Time of Use Billing
Got my first full-month electric bill using “Time of Use” billing for electricity. I don’t have a family at home
Continue readingPulled In: the index
I’ve done this before… I’ve “pulled in” things that I wrote elsewhere and saved them on this blog. I’ve decided
Continue reading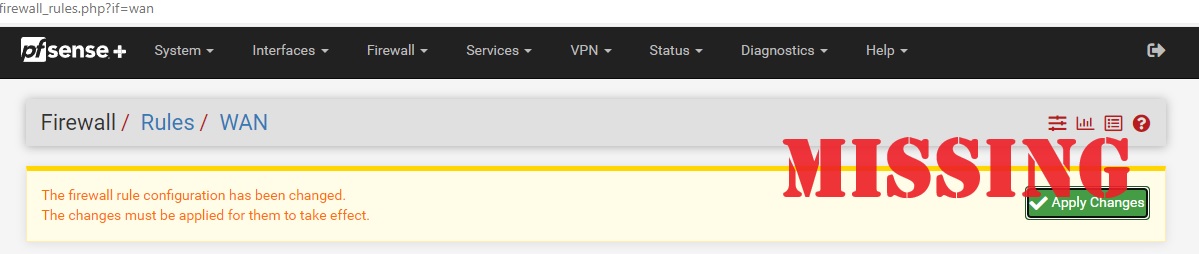
FIXED: pfSense Missing APPLY CHANGES Button
A few weeks ago I was making changes to a firewall rule in a pfSense+ 23.05.1-RELEASE version firewall. But after
Continue readingWhen do I use the most electricity?
So the full bill doesn’t really matter, because this month wasn’t a full month on the “Time of Use” billing
Continue readingElectric Car: switching to renewables & time of use billing
Well, I may not be much, but I’m a man of my morals. Did 2 things today: 1 signed up
Continue reading