Adding another user's mailbox in Outlook, using BPOS & Office 365

This week’s post is another slightly more advanced one, so I apologize, but if you share this with your IT department, they’ll have no excuses! So you want full access to another user’s mailbox. It can be done, and has been done, with Exchange servers around the world. However if you need to do this in Microsoft’s Busness Productivity Online Suite (BPOS), then how in the world do you do it?

It used to be you could go to your Exchange server, find the user who is going to share their info with another user, and give them Send-As or Full-Access permissions. But where is that option in BPOS? It’s nowhere, that’s the problem. But that doesn’t mean you can’t do it.

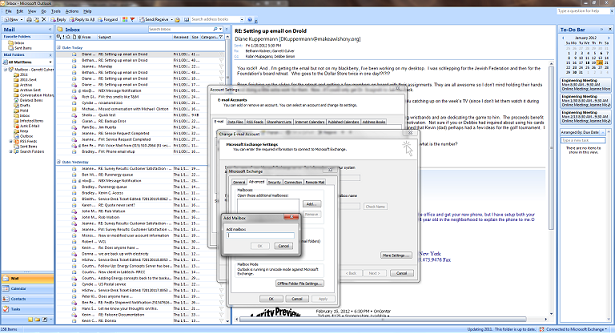
First off, any user who is an Administrator in BPOS already has access to anybody’s mailbox under their domain. Meaning you can open up your Outlook client, go to your account settings, click Change, click More Settings, go to the Advanced Tab, then click ADD, and type a user’s name. It’s that easy.

But I haven’t answered your question, yet. WHAT ABOUT BPOS? Here’s the scoop. I figured this one out a few days ago and have only tested it in Business Productivity Online Suite. However, a support rep from Microsoft has “confirmed” that these commands should work in Office 365. Your mileage may vary.

Let’s say I have two users, Vera (vera@whutsit.com) and Dave (dave@whutsit.com). Vera needs full permissions to Dave’s email. She will be using the simple steps above to add Dave’s mailbox to her Outlook, however Vera is not a domain administrator, so a special permission will need to be created in the system. This is surprisingly easy to do.

An Administrator must run command in the Migration Command Shell (which was set up, at some point, during your migration to BPOS).

EXAMPLES

Enter the following cmdlets as ONE SINGLE COMMAND (any line breaks are due to web-design):
To GIVE Vera access to Dave’s mail:
Add-MSOnlineMailPermission -Identity vera@whutsit.com -TrustedUser dave@whutsit.com -GrantFullAccess $True

At some point down the road you may need to REVOKE that access:
Remove-MSOnlineMailPermission -Identity vera@whutsit.com -TrustedUser dave@whutsit.com -RemoveFullAccess $True

Note how the commands differe: the “Remove” not only at the beginning, but the end ofthe command, rather than “Add” and “Grant” respectively. I’m by no means an expert with this, but I certainly hope this helps someone out there!

In my router, what is WMM and should I enable it? Hint: yes!

Update: More than 5 years after writing this, it’s still one of the most popular articles on my website, so I decided to make a short video that explains this as well! 😉


Original post below:
Fridays are usually video game related articles. Today, I’m not talking about games themselves, but how the gaming console has become the entertainment hub in your livingroom. It’s a lengthy post, but I think it will prove to be of some value to most readers! The long and short of it is: I was having major problems streaming Netflix to any of my wireless consoles – PS3, 360, or Wii. But my desktop computer worked fine. I enabled WMM and the majority of my problems were solved. It’s not a one touch fix, by any means – there are a million potential reasons video would be buffering, even times when the service you’re streaming from won’t have adequate bandwidth, are caught throttling your connection, or are being investigated for generally poor speeds. There are times when your regional ISP may just be having technical issues. There are an abundance of issues that can arise at the dozens of hops between you and the media you’re watching or listening to. But, in optimal conditions, WMM is a feature that will help you.

There are debates galore concerning not only the effectiveness, but the legitimacy of “Wi-Fi Multimediaâ„¢ (WMM®) WMM® Quality of Service.” People don’t know what it is, don’t understand it, or don’t think it really does anything. Well, it’s my opinion and experience that it does make a difference for streaming movies, it’s worth noting, however that some people prefer to have this feature disabled, and doing so they claim faster overall throughput (faster “file” downloads). Personally, when I have WMM enabled, I do not see my regular download speeds slowed at all, and I enjoy the added benefit of buffer-free streaming to my Wi-Fi devices. Therefore, I’m going to explain not only why I think you should enable, but how to enable it.

The rest of this article gets technical, and also may have instructions which you don’t need – the “meat” of the question is answered above

.


A little background on WMM

Created by the Wi-Fi Alliance, a group of entities, including the manufacturers of wireless access points and networking hardware, WMM was designed to enhance the streaming of multimedia over wireless devices. From the technical side of things, despite drastic advancements in wireless technology, there will always be slightly higher latency in Wi-Fi devices than in wired connections. Trying to avoid all of the technical information, WMM allows traffic related to multi-media to take a higher priority, thus their packets get delivered first, meaning their “received!” packets will get back to the source sooner, meaning more packets will come your way sooner! “Net neutrality” goes out the Window… but only on your wireless network! In reality, if you enable WMM on your router, particularly in a home environment, it will not impact your other devices on the network, unless, say, you’re downloading and seeding a dozen torrents, streaming twenty movies, and making four VOIP calls at the same time!

Services like Zune, Qriocity, Last.FM, YouTube, Netflix, and Vudu have capitalized on that, by making their software available on your home console. But do you ever have problems with your console, be it Xbox, PS3, Wii, or other Wi-Fi devices like your phone or tablet, buffering? If you try it on your wired computer or laptop or even on the same console, just wired directly to your router, you have no problem. But if you try to use Wi-Fi, whatever you’re watching or listening to simply keeps getting interrupted. It doesn’t make any sense: you know you have enough bandwidth, other devices work, why not this stupid console? Why is everyone enjoying Inside Xbox but you?

Here’s what to do


I’m not positive about the others, but I do know that on a LinkSys, WMM is Disabled by default – which is why I wanted to share this tip with everyone, because it actually made a difference for me! Open up your web browser, and go to the address: 192.168.1.1 (if it is different from this, you’re probably advanced enough to know how to find it, because you most likely changed it yourself!).

Enter your router’s password. If you’ve never set it, there are several potential default passwords.

What’s the default password for my router?

  • LinkSys / Cisco: username: {none} / password: admin
  • NetGear: username: admin / password: password or 1234
  • D-Link: username: admin / password: admin – in some cases, D-Link may have no name, or no password, or use user as the username.
  • For best results, a quick search on the web ought to point you in the right direction of finding your specific router’s password
  • .

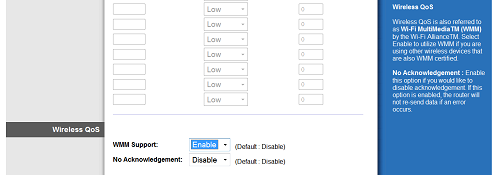
Once inside your router, you should be able to find an applications tab – in the case of the LinkSys WRT54G2 that we’re using in this example (an extremely common home router), it’s listed as Applications and Gaming. Here’s what it looks like for most LinkSys WRT54xx series routers:

After you click the tab at the top, the subtabs will change. As you can see in the same picture above, there will be an option that says
QoS. Click to the Quality of Service or QoS subtab.

Scroll to the bottom of the page and change the drop down for WMM to Enabled.

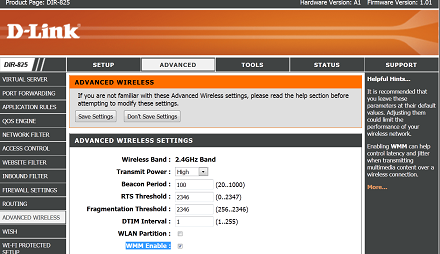
In a D-Link, you should go to the Advanced Tab, the Wireless Routing option on the left, then check the box to enable WMM.

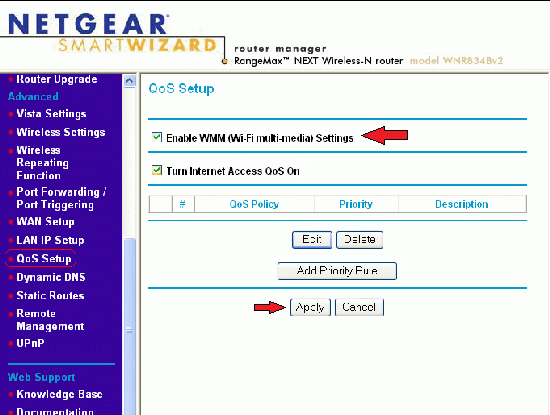
On a NetGear, look for the QoS Setup option, under the blue Advanced header on the left side of the page. Click on that, then check the box to Enable WMM and click the small Apply button at the bottom.

*WHEW!!* Now that was an exhaustive post, but I hope it will get people thinking that they should give WMM a try, and help them ensure it’s enabled on their router!

How to Fix 0xc0000218 Registry Hive Error, or Boot.ini Missing Or Corrupt

Today is a Tech Tip Two-for-one. 0xc0000218, or a missing Boot.ini file. If 0xc0000218 doesn’t apply to you, scroll past it to see how to fix a missing boot.ini or HAL.dll file. This advice from Help Desk is a little more on the advanced side, it’s not the kind of problem you’ll see every day. However, the errors you’ll see here are errors anybody can recover from. You know you’re in for a bad day when your computer won’t boot, but these tips out, they may get you back up and running. Since this article is for slightly more advanced users, I’m going to leave out some of the basics – when I say “Boot to the Recovery Console” I’m going to assume you know what that means. While these are errors that are easy to overcome, one misstep in this part of the computer can cause a world of trouble, so you still may want to rely on an experienced friend for assistance.

0xc0000218

I had a user who was getting a Blue Screen error on their Windows XP machine, right after or during bootup. It read:

Stop: 0xc0000218 {Registry File Failure}
The registry cannot load the hive (file):
\SystemRoot\System32\Config\SYSTEM or its log or alternate.
It is corrupt, absent, or not writable.

To resolve this wasn’t too painful. If you perform a true Repair from a Windows XP disc, a lot of customization can be wiped out. Here’s what I did to just get back up and running, and not worry about my user profiles and everything else:

NOTE: In the case of my example, the corrupted file was SYSTEM, but yours may indicate a problem with the SOFTWARE hive. If that’s the case, replace SYSTEM at the end of any line below with SOFTWARE. If you can do it from the Windows Advanced Startup Options even better, but you may have to boot from a Windows XP CD – but either way you want to get to the Recovery Console.

I always type the following just to make sure I get back to the root of the C: drive, then in to the Windows directory. If you’ve installed Windows elsewhere, of course navigate to the proper directory, like WINNT.

  1. cd
  2. cd windows
  3. cd system32
  4. cd config
  5. rename system system.bak
  6. copy C:\windows\repair\system c:\windows\system32\config\system
  7. exit

Let the computer reboot and see if your problem is resolved!

If your computer reports that the Boot.ini file is missing or corrupt:

  1. Boot an XP CD
  2. select the recovery console
  3. Attrib -h -r -s C:\boot.ini
  4. del C:\boot.ini
  5. bootcfg /rebuild
  6. fixboot
  7. exit
  8. After the reboot, you should be able to get back in to Windows!

I’ve been told that this works for the HAL.dll boot error as well, but I’m not certain, I’ve only ever used it for a boot.ini problem. It’s important to note that whether your have a problem with your registry hive or your boot.ini or whatever – you shouldn’t rely on these as “Fixes” to your problem. You certainly have a corrupt Windows installation and could even have a failing hard drive – you should back your data up immediately if either of these presented solutions lets you back in to your system.

Android Unable to Mount SD Card solved!

This isn’t quite my normal “From the Help Desk” kind of tip for a tech-tip-Tuesday, but I ran in to it last week and thought you might want to know about it.

I recently received an error from my Android, after a reboot, that it was unable to mount my SD Card, and suggested that it may need formatting. Bad sign. I wasn’t about to Format my SD Card and lose everything to “fix” the issue. I would have to reinstall a ton of apps, I would lose photos, music, and other documents on the card… no, I wasn’t going to have any part of this.

I removed and reinserted the card several times, rebooted the phone multiple times: nothing worked. Finally I inserted the card in to my laptop’s SD Card reader, and even then I was greeted with the same error message, that I would need to format the disk. Again, no thanks. So here’s all I had to do:

Before continuing: it is possible that this process will not fix your card, it may be beyond normal repair, but this is just a suggestion that was able to get me back in business. Something is corrupt that is causing this issue, and there may be some applications or data on the card that is corrupted during the “repair” process, you may lose some data in thies proess. Again, although typically minimal if at all, this “fix” can result in data loss. Also, this is likely not a PERMANENT solution for you – the card is probably beginning to go bad and should be replaced as soon as possible.

With the card inserted in to the computer, it should be assigned a drive letter (for example, “E:“). If you’re in the “Computer” (Windows 7) or “My Computer” (Windows XP) screen, you’ll see the drive listed, with a letter, but if you double click on it, it will prompt you to format the sd card. DO NOT format the card.

1) Open a command prompt:
Windows 7: Start > search for CMD > click the program listed as CMD with the little black icon
or
Windows XP: Start > Run > cmd > OK (or enter)

2) In the command prompt that appears type the following (note, in my example, my SD Card was given the drive letter of E: – but replace the E: with whatever letter your card has been assigned in My Computer):
chkdsk E: /f /r
Then press ENTER.

You will see the computer run a checkdisk process on the sd card. It will repair whatever is wrong with the filesystem and you’ll most likely be able to use the card in your phone again. But do not ignore this warning – the card is clearly beginning to fail and you should move important data off of it and REPLACE the card entirely as soon as possible, copying all of your data to a new card!

If you don’t have an SD Card Adapter like the one pictured above, or any other way to connect your SD Card to your computer, I do not know of any way to perform this process while the card is still inside your phone, sorry.