SonicWall and Cisco VPN Client Download Links

Why is it so hard to download VPN software? Too many times I’ve been in a pinch and needed a VPN client to install for someone. To get the files installed, I have to log in to the website for Cisco or SonicWall and dig around for what I need… for some reason, they lock these things down. You can’t use them without already owning the multi-hundreds-of-dollars piece of hardware, anyway, so why they keep the software under lock and key makes no sense to me. Well, I’ve found some links with the files you need – they aren’t the LATEST versions (in fact, I don’t have the exact version numbers written down), but I can guarantee they work for Windows XP, Vista, 7, as well as your 32-bit or 64-bit needs. I’ve even found a client which, I’m told (I’m not a Mac Guy) works on all versions of Mac OS X (at least up to Lion), if necessary – although with Mac users, IPSEC connections are probably built right in and will work fine. The links are reliable and have been online for a long while, feel free to post below if they ever don’t work for you.

UPDATE 1: SonicWall has gotten the hint that people are tired of hunting. While my links are still available below, SonicWall has finally provided links to the latest Global VPN Clients.

Update 2: WARNING – these downloads are available for your convenience, but please note that I have added approximate dates to files. THEY ARE OLD. They are functional, but they may not be the most compatible with newer operating systems, hardware, or may even have security flaws that have been fixed in newer versions. For the latest Sonicwall client visit their download page. To download the latest Cisco client you must have an active membership with Cisco – your IT department or contractor should be able to obtain the latest versions for you from this page. Again, local downloads are available if necessary, but you should look into getting newer, more secure versions of the software as soon as possible.


Cisco VPN Client 32-bit – 2010 or older.
Cisco VPN Client 64-bit – 2010 or older.
Cisco VPN Client DMG for Mac – 2010 or older.


SonicWall Global VPN Client 32-bit – 2011 or older.
SonicWall Global VPN Client 64-bit – 2011 or older.

Enjoy the links!

My IT Toolkit

Nothing specific from the help desk today, but I just wanted to refer you to several tools I use frequently in my job. Some of them I have been using for years, and one of them for literally over a decade. These are applications I trust and I use. I am in no way affiliated with any of these products, and am only recommending them because they genuinely work for me! Put some of this stuff on your flashdrive and you’ll have the Swiss army knife of IT toolkits.

Antivirus:

Anti-Malware:

Password Recovery:

Data Recovery:

Drive Imaging:

Now I know some of you may say I left out some other useful tools, or your favorites – this isn’t a comprensive list of everything I use regularly, these are just some of the ones I immediately turn to. I’ll gladly say I also use several resources like RogueKiller and ComboFix from BleepingComputer.com, sites like InternetHealthReport.com to diagnose internet connectivity issues, and use other products like Microsoft Steady State, Comodo Time Machine, RollbackRX for keeping a system in running order, MetaSploit, BackTrack, and ImmunityCanvas for pentesting, and Acronis TrueImage or even Norton Ghost when they’re called for in system imaging. But the list above are some of my favorites. If they’re not working for you, I’d encourage you to find something that will by using AlternativeTo.

Awesome Windows 7 Wallpapers and Themes Straight from Microsoft!

In my job in the help desk, I remove a lot of viruses. A lot of times these viruses come down with fancy screen savers, wall papers, and general themes designed for specific holidays or whatever the reason may be. To avoid viruses, I advise people to download their themes straight from Microsoft. Unlike the good old days where themes were complex, large, and not even that great, the new themes for Windows 7 are stunning, awesome, beautiful, amazing, cool, stellar – pick your adjective. You can see just one of the many wallpapers below, in the screenshot where I describe how to get to these themes.

Many themes, like many of the stock Windows 7 themes, include multiple wallpapers which your computer will cycle through periodically. They will automatically adjust the “Aero Glass” color scheme, and most will change the sound scheme, though most don’t include new soundscapes – they just use the ones that came with Windows 7. My favorites are fractal art, dark abstracts, and ice water. That’s right, ice water. High definition photographs of ice cubes in water. There’s a similar, more colorful theme called party ice.

To access them, go to the desktop of your own computer. Minimize everything so you just so your existing wallpaper and desktop icons. Right click off in an empty space on your desktop, then click Personalize at the very bottom of the right click context menu. From there, look for the link option that says “Get more themes online.” I have linked to it in the text, but if you ever need to find it again, that’s how easily you can get to the page.

Once you’re on that page, pick your theme, and click the download link. When prompted, just click RUN instead of Save – the theme will download and store itself on your computer automatically. You don’t have to worry about where the downloaded file went, the theme will be installed just by selecting Open! Even if you change themes later, you can always go back to the personal menu and switch between your themes!

The themes themselves traverse the entire spectrum: dark and brooding, colorful and happy, game related (Halo, Gears of War, Bullet Asylum and more games have hi-resolution wallpapers on this page), landscapes, hi-def photography, Christmas, Valentines Day, Halloween, Year of the Dragon, Rabbit, Tiger… the list goes on and on. Download these high definition themes for free, from Microsoft.

Solution to The Trust Relationship Between This Workstation and Primary Domain Failed

Happy Tech Tip Tuesday to you! In this week’s edition, I bring you a technical and ugly problem. When you try to log on to your computer, you receive the error message: “The Trust Relationship Between This Workstation and Primary Domain Failed.” Get your IT guy, because this one is going to require a little bit of tech savvy and a few passwords that not everybody in an organization is going to have. We won’t get in to the nitty gritty of why this happens, we’ll just get right down to how to fix it!

The first thing we need to when we get the error “The Trust Relationship Between This Workstation and Primary Domain Failed” is to get logged back in to the machine. Preferably with the domain administrator’s credentials. Typically, in a simple network setup, the user’s name is Administrator and it’s the password used to log on to the domain controller, or your primary server.

Don’t miss this step: What if that user still can’t get logged in? Simple! UNPLUG THE NETWORK CABLE from the computer. When it cannot detect a network connection, the computer will allow you to login with cached credentials, meaning it will accept the name and password that it remembers from the last time you logged on.

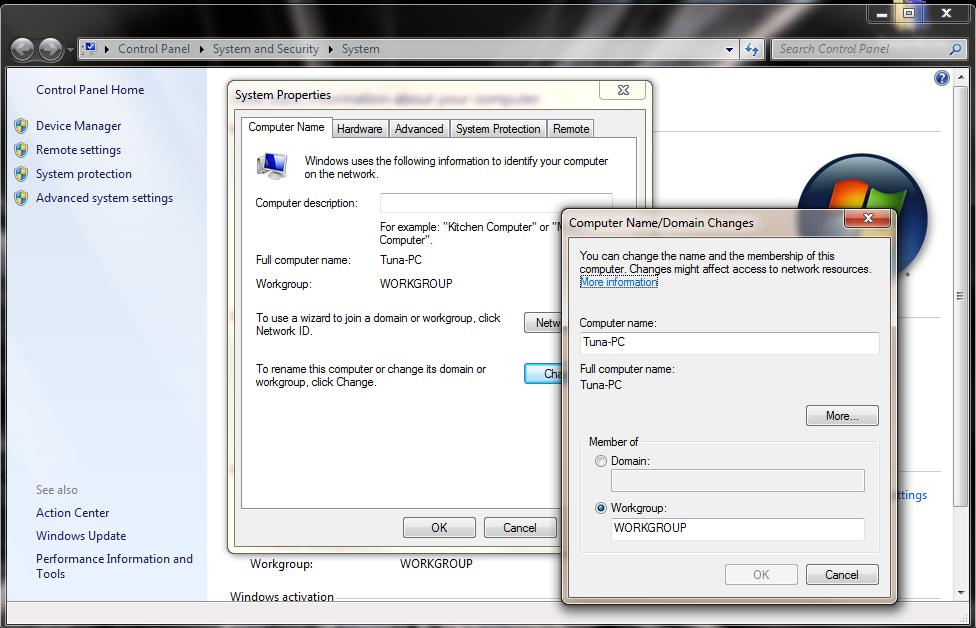
Once you’re logged on as Administrator, you need to place the computer in to a workgroup, then RE-Join it to the domain. Here’s the blow by blow:

  1. On the keyboard Hold down the Windows Key and Press the Pause Key
  2. (or RIGHT CLICK the “Computer” or “My Computer” in your Start Menu and click “Properties”).

  3. In Windows XP, click the Computer Name tab – in Windows Vista/7, click Advanced System Settings on the left, then click the Computer Name tab.
  4. Click the Change button
  5. At the BOTTOM of the Window, first NOTE WHAT IT SAYS IN THE DOMAIN FIELD. WRITE THIS DOWN.
  6. Select the WORKGROUP radio button & enter a name (example: call it WORKGROUP temporarily)
  7. Click OK. You MAY be prompted to restart the computer. Decline at this time.
  8. If necessary, plug your network cable back in at this time.
  9. Click the CHANGE button again.
  10. Click the Domain radio button and enter the information you wrote from step 4
  11. Click OK and restart the computer as asked.

Upon rebooting, you should be able to log back in to the computer as yourself! If you restarted during step 6, you will need to login using a username with Local Administrator Credentials. If you don’t know a password or username to use, you’ll have to reset them using a tool called NTPassword (looks fake, works great) (UPDATE: New Blog Post: how to use NTPassword), but I won’t get in to the specifics of that here. On some Windows XP machines, you may get lucky just trying the name Administrator with no password. Best of luck in the process, though. It generally isn’t too painful to get back online after “the trust relationship has been broken!”