LibreOffice (and it’s grand daddy, OpenOffice) are excellent programs with a long history in the Open Source community. The projects provide a wonderful inexpensive or even completely free alternative to the power house, Microsoft Office.
I’m often asked if there’s a way to open your Word, Excel, even PowerPoint files with LibreOffice. The good news is that once you install LibreOffice, it can automatically take over file associations, meaning that when you double click a .DOC (Word ’97-2003) or .DOCX (Word 2007-2016) file, it will open right up in the LibreOffice “Writer” module, just as if it were opening in Word.
But what about Saving files? By default, LibreOffice uses an ‘Open Document Format’ or ODF Text (.odt) file format to save documents. Although these should open in Microsoft Word, sometimes you send these files to colleagues, friends, or teachers, and the document won’t open on their end, and you catch heat. So the easiest thing to do is to make sure you’re saving all of your files in a compatible Microsoft Word format. Same goes for other document types. I’ll show you how to change the DEFAULT SAVE-AS FILE TYPE in LibreOffice to Microsoft compatible documents (I will provide examples of “Word” and “Excel” compatible files, once you have this down, you will be able to do other formats as well).
- With LibreOffice installed (for this example I’m using version 5.0.1.2, September 2015), just click the “LibreOffice” icon on the desktop or in the Start Menu, then click “Writer Document” on the left, to create a new Writer document.
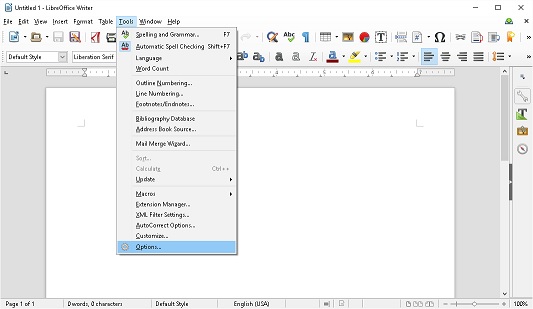
- Click Tools from the Menu Bar across the top, then Options at the bottom of the Tools menu.
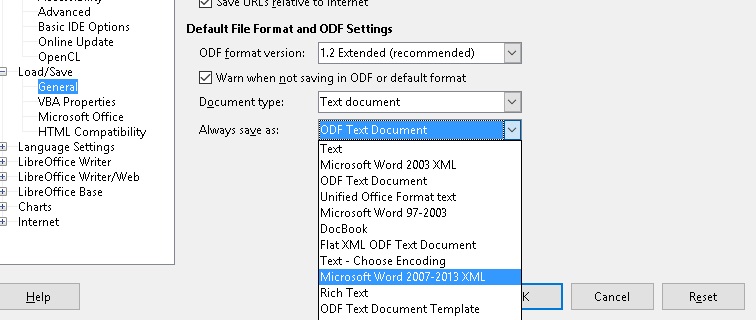
- In the Options Menu, click the “+” sign beside “Load/Save” then click on General underneath that.
- At the bottom right, you’ll see an option that says “ODF Text Document.” Click that Drop Down and change it to Microsoft Word 2007-2013 XML (to save as .DOCX), or Microsoft Word 97-2003 (to save as .DOC).
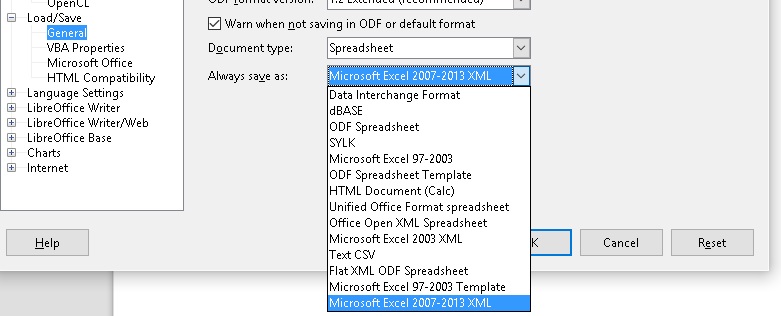
- Next, click the drop down box above that, which simply says “Text document” and change it to “Spreadsheet.”
- Now change the bottom box from “ODF Spreadsheet” to Microsoft Excel 2007-2013 XML (for saving as .XLSX files), or Excel 97-2003 (to save as .XLS files).
- Click OK.
You can also change “Presentations” to PowerPoint compatible files (.pptx/,ppt). Important when choosing a Microsoft Word, Excel, or PowerPoint format, make sure you do not choose “TEMPLATE” by mistake. You do not want to save your every-day documents as TEMPLATES (an option you can see in some of the drop down list screen shots above), or that will cause issues for the people opening them.
That should do the trick, though! You now have a fully functional free alternative to Microsoft Office! Enjoy!